Temperature Logging: Redux
Previously as I was experimenting with logging the temperature using a Raspberry Pi (to monitor the temperatures experienced by fermenting cider), I noted that the Pi was something of a terrible hack, and it should be possible to do more efficiently with some slightly less common hardware.
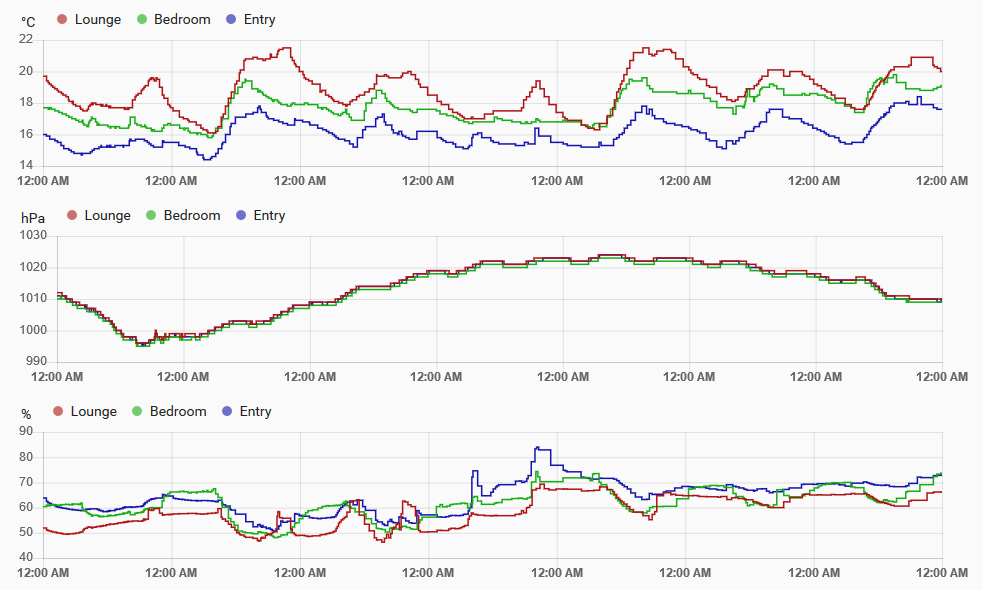
I decided that improved version would be interesting to build for use at home, since it’s both kind of fun to collect data like that, and actually knowing the temperature in the house is useful at times. The end result of this project is that I can generate graphs like the one below of conditions around the house:
Software requirements
My primary requirement for home monitoring of this sort is that it not depend on a proprietary hub (especially not one that depends on an external service that might go away without warning), and I’d also like something that can be integrated with my existing (but minimal) home automation setup that’s based around Home Assistant running on my home server.
Given my main software is open source it should be possible to integrate an arbitrary solution with it, with varying amount of reverse engineering and implementation necessary. Because reverse-engineering services like that is not my idea of fun, it’s much preferable to find something that’s already supported and take advantage of others’ work. While I don’t mind debugging, I don’t want to build an integration from scratch if I don’t need to.
Hardware selection
As observed last time, the “hub” model for connecting “internet of things” devices to a network seems to be the best choice from a security standpoint- the only externally-visible network device is the hub, which can apply arbitrary security policies to communications between devices and to public networks (in the simplest case, forbidding all communications with public networks). Indeed, recent scholarly work (PDF) suggests systems that work on this model but apply more sophisticated policies to communications passing through the hub.
With that in mind, I decided a Zigbee network for my sensors would be appropriate- the sensors themselves have no ability to talk to public networks because they don’t even run an Internet Protocol stack, and it’s already a fairly common standard for communication. Plus, I was able to get several of the previously-mentioned Xiaomi temperature, humidity and barometric pressure sensors for about $10 each; a quite reasonable cost, given they’re battery powered with very long life and good wireless range.
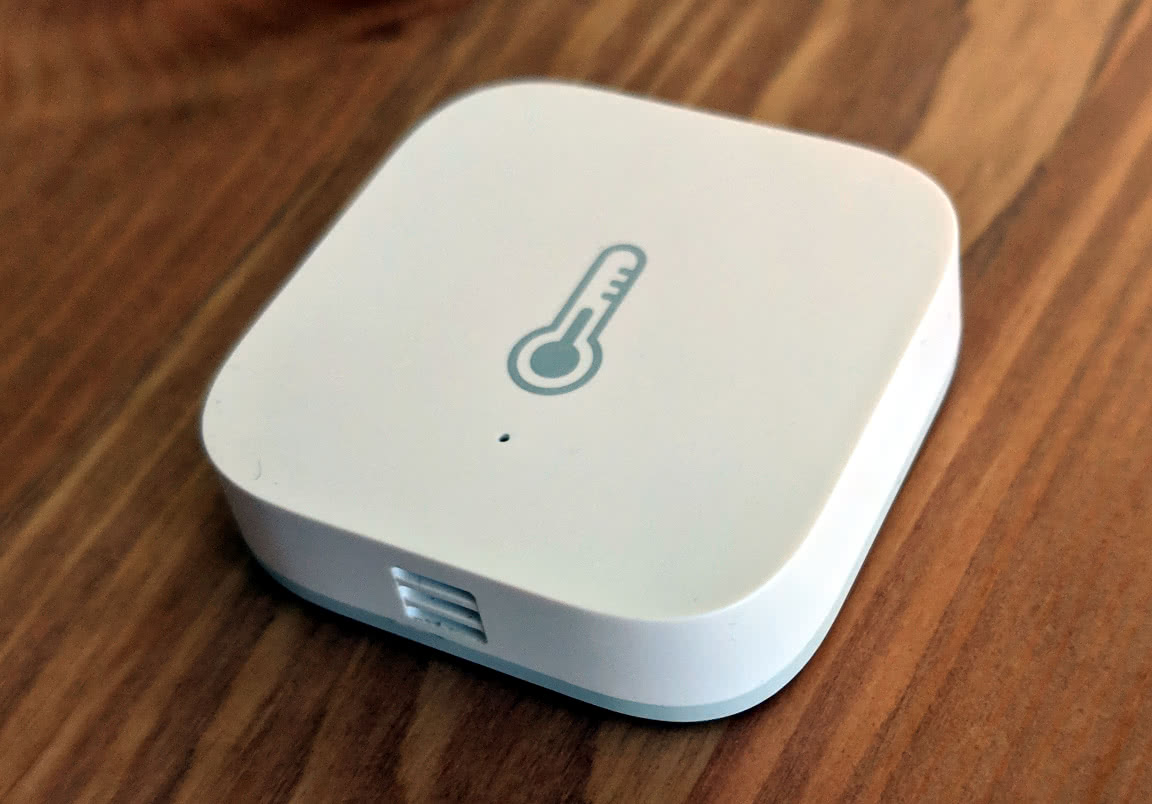
One of the Xiaomi temperature/humidity/pressure sensors.
Home assistant already has some support for Zigbee devices; most relevant here seems to be its implementation of the Zigbee Home Automation application standard. Though the documentation isn’t very clear, it supports (or, should support) any radio that communicates with a host processor over a UART interface and speaks either the XBee or EZSP serial protocol.
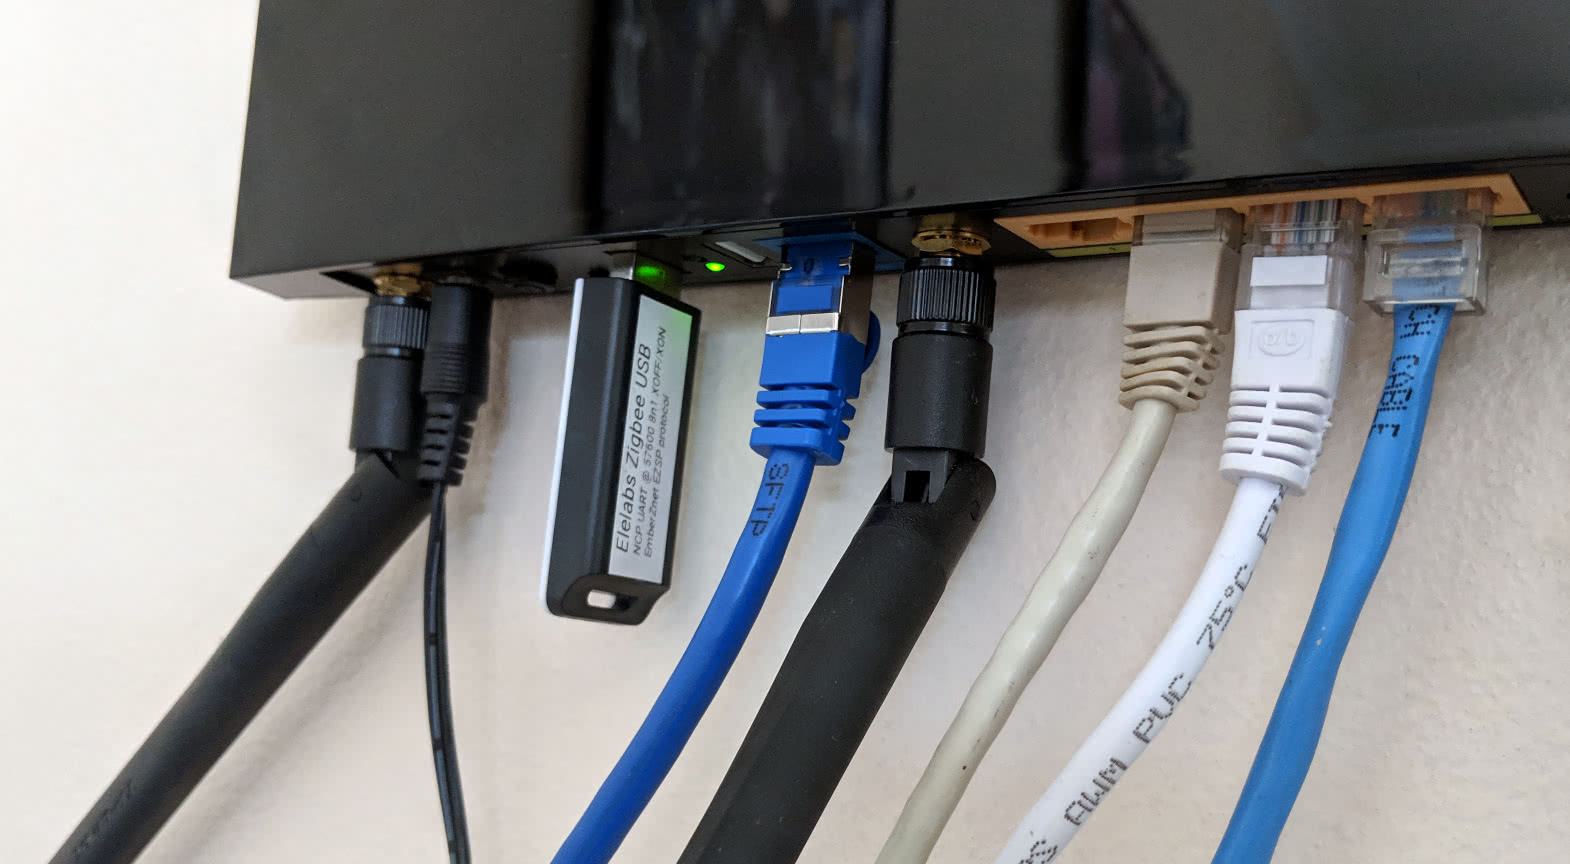
Since the documentation for Home Assistant specifically notes that the Elelabs Zigbee USB adapter is compatible, I bought one of those. Its documentation includes a description of how to configure Home Assistant with it and specifically mentions Xiaomi Aqara devices (which includes the sensors I had selected), so I was confident that radio would meet my needs, though unsure of exactly what protocol was actually used to communicate with the radio over USB at the time I ordered it.
Experimenting
Once I received the Zigbee radio-on-a-usb-stick, I immediately tried to manually drive it using whatever libraries I could use to set up a network and get one of my sensors connected to it. This ended up not working, but I did learn a lot about how the radio adapter is meant to work.
For working with it in Python, the Elelabs documentation points to bellows, a library providing EZSP protocol support for the zigpy Zigbee stack. It also includes a command-line interface exposing some basic commands, perfect for the sort of experimentation I wanted to do.
Getting connected was easy; I plugged the USB stick into my Linux workstation and it appeared right away as a PL2303 USB-to-serial converter. Between this and noting that bellows implements the EZSP protocol, I inferred that the Elelabs stick is a Silicon Labs EM35x microcontroller running the EmberZNet stack in a network coordinator mode, with a PL2303 exposing a UART over USB so the host can communicate with the microcontroller (and the rest of the network) by speaking EZSP.
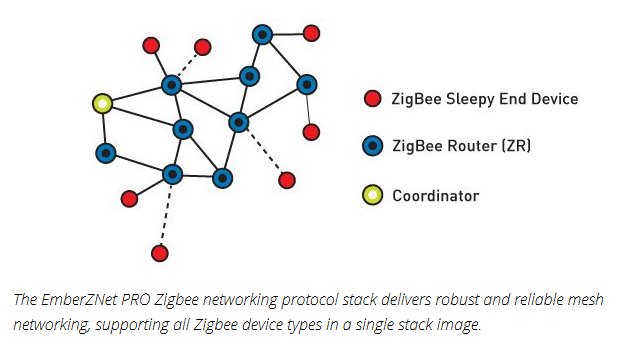
SiLabs marketing does a pretty good job of selling their software stack.
Having worked that out and made sense of it, I printed out a label for the stick that says what it is (“Elelabs Zigbee USB adapter”) and how to communicate with it (EZSP at 57600 baud) since the stick is completely unmarked otherwise and being able to tell what it does just by looking at it is very helpful.
Trying to use the bellows CLI, the status output seemed okay and the NCP was
running. In order to connect one of my sensors, I then needed to figure out how
to make the sensor join the network after using bellows permit to let new
devices join the network. The sensors each came with a little instruction
booklet, but it was all in Chinese. With the help of Google Translate, I was
able to take photos of it and find the important bit- holding the button on the
sensor for about 5 seconds until the LED blinks three times will reset it, at
which point it will attempt to join an open network.
On trying to run bellows permit prior to resetting a sensor to get it on the
network, I encountered an annoying bug- it didn’t seem to do anything, and
Python emitted a warning: RuntimeWarning: coroutine 'permit' was never awaited. I dug into that a little more and found the libraries make heavy use
of PEP 492 coroutines, and the
warning was fairly clear that a function was declared async when it shouldn’t
have been (or its coroutine wasn’t then given to an event loop) so the function
actually implementing permit never ran. I eventually tracked down the problem,
patched it locally and filed a
bug which has since been fixed.
Having fixed that bug, I continued to try to get a sensor on my toy network but was ultimately (apparently) unsuccessful. I could permit joins and reset the sensor and see debug output indicating something was happening on the network, but never any conclusive messages saying a new device had joined and rather a lot of messages along the lines of “unrecognized message.” I couldn’t tell if it was working or not, so moved on to hooking up Home Assistant.
Setting up Home Assistant
Getting set up with Home Assistant was mostly just a matter of following the
guide provided with the USB stick, but
using my own knowledge of how to set up the software (not using hassio).
Configuring the zha component and pointing it at the right USB path is pretty
easy. I did discover that specifying the database_path for the zha component
alone is not enough to make it work; if the file doesn’t already exist setup
just fails. Simply creating an empty file at the configured path is enough-
apparently that file is an sqlite database that zigpy uses to track known
devices.
Still following the Elelabs document, I spent a bit of time invoking
zha.permit and trying to get a sensor online to no apparent success. After a
little more searching, I found discussion on the Home Assistant forums and in
particular one user suggesting that these particular sensors are somewhat
finicky when joining a network. They suggested (and my findings agree) that
holding the button on the sensor to reset it, then tapping the button
approximately every second for a little while (another 5-10 seconds) will keep
it awake long enough to successfully join the network.
The keep-awake tapping approach did eventually work, though I also found that Home Assistant sometimes didn’t show a new sensor (or parts of a new sensor, like it might show the temperature but not humidity or pressure) until I restarted it. This might be a bug or a misconfiguration on my part, but it’s minor enough not to worry about.
At this point I’ve verified that my software and hardware can all work, so it’s time to set up the permanent configuration.
Permanent configuration
As mentioned above, I run Home Assistant on my Linux home server. Since I was already experimenting on a Linux system, that configuration should be trivial to transfer over, but for one additional desire I had: I want more freedom in where I place the Zigbee radio, in particular not just plugged directly into a free USB port on the server. Putting it in a reasonably central location with other radios (say, near the WiFi router) would be nice.
A simple solution might be a USB extension cable, but I didn’t have any of those handy and strewing more wires about the place feels inelegant. My Internet router (a TP-Link Archer C7 running OpenWrt) does have an available USB port though, so I suspected it would be possible to connect the Zigbee radio to the router and make it appear as a serial port on the server. This turned out to be true!
Serial over network
To find the solution for running a serial port over the network, I first searched for existing protocols; it turns out there’s a standard one that’s somewhat commonly used in fancy networking equipment, specified by RFC 2217. RFC 2217 specifies a set of extensions to Telnet allowing serial port configuration (bit rate, data bits, parity, etc) and flow control over Telnet.
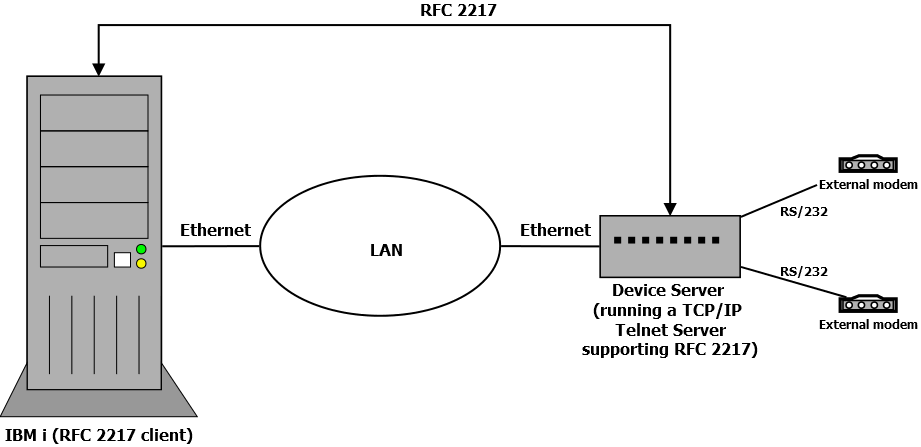
A diagram of RFC 2217 application from some IBM documentation.
Having identified a protocol that does what I want, it’s then a matter of
finding software that works as a client (assuming I’ll be able to find or write
a suitable server). Suitable clients are somewhat tricky however, since from an
applicaton perspective UART use on Linux involves making specialized
ioctls to the device
to configure it, then reading and writing bytes as usual. Making an RFC2217
network serial device appear like a local device would seem to involve writing a
kernel driver that exports a new class of RFC2217 device nodes supporting the
relevant ioctls- none exists.1
An alternate approach (not using RFC 2217) might be USB/IP, which is supported in mainline Linux and allows a server to bind USB devices physically connected to it to a virtual USB controller that can then be remotely attached to a different physical machine over a network. This seems like a more complex and potentially fragile solution though, so I put that aside after learning of it.
Since Linux doesn’t have any kernel-level support for remote serial ports, I
needed to search for support at the application level. It turns out bellows
uses pyserial to communicate with radios, and pySerial is a quite featureful
library- while most users will only ever provide device names like COM1 or
/dev/ttyUSB0, it supports a range of more exotic
URLs specifying
connections, including RFC 2217.
So given a suitable server running on a remote machine, I should be able to
configure Home Assistant to use a URL like rfc2217://zigbee.local:25 to reach
the Zigbee radio.
Serial server
The next step in setting up the Zigbee radio plugged into the router is finding
an application that can expose a PL2303 over the network with the RFC 2217
protocol. That turned out to be a short search, where I quickly discovered
ser2net which does the job and is already
packaged for OpenWRT. Installing it on the router was trivial, though I also
needed to be sure the kernel module(s) required to expose the USB-serial port
were available:
| |
Having installed ser2net, I still had to figure out how to configure it. While
the documentation describes its configuration format, I know from experience
that configuring servers on OpenWRT is usually done differently (as something of
a concession to targeting embedded systems without much storage). I quickly
found that the package had installed a sample configuration file at
/etc/config/ser2net:
| |
Unfortunately, this configuration doesn’t include any comments so the reader is
force to guess the meaning of each option. They mostly correspond to words that
appear in the ser2net manual, but I didn’t trust guesses so went digging in the
OpenWRT packages source code and found the script responsible for
converting
/etc/config/ser2net into an actual configuration file when starting ser2net.
My initial guess at the configuration I wanted looked something like this:
| |
The protocol is specified as telnet because RFC 2217 is a layer on top of telnet
(my first guess was that I actually wanted raw until actually reading the RFC
and seeing it was a set of telnet extensions), and the device is the device name
that I found the Zigbee stick appeared as when plugged into the
router.2 Unfortunately, this configuration didn’t work and pyserial
gave gack a somewhat perplexing error message:
serial.serialutil.SerialException: Remote does not seem to support RFC2217 or BINARY mode [we-BINARY:False(INACTIVE), we-RFC2217:False(REQUESTED)].
Without much visibility into what the serial driver was trying to do, I opted to
examine the network traffic with Wireshark. I first attempted to use the
text-mode interface (tshark -d tcp.port==5000,telnet -f 'port 5000'), but
quickly gave up and switched to the GUI instead. I captured the traffic passing
between the server and router, but there was almost nothing! The client
(pyserial) was sending some Telnet negotiation messages (DO ECHO, WILL suppress
go ahead and COM port control), then nothing happened for a few seconds and the
connection closed.
Since restarting Home Assistant for every one of these serial tests was quite
cumbersome, at this point I checked if pyserial includes any programs suitable
for testing connectivity. It happily does, provided in my distribution’s package
as miniterm.py. Running miniterm.py rfc2217://c7:5000 failed in the same
way, so I had a quicker debugging tool.
At this point the problem seems like it’s at the server side, so I stopped the ser2net server on the router and started one in the foreground, with a custom configuration specified on the command line:
| |
While ser2net didn’t outright fail, it did print a concerning error message.
Does it work if I change the port it’s listening on?
| |
And then running miniterm.py succeeds, leaving me with a terminal I could type
into (but didn’t, since I don’t know how to speak EZSP with my keyboard).
| |
I discovered after a little digging (netstat -lnp) that miniupnpd was
already listening on port 5000 of the router, so changing the port fixes the
confusing problem. A different sample port in the ser2net configuration would
have prevented such an issue, as would ser2net giving up when it fails to bind
to a requested port instead of printing a message and pretending nothing
happened. But at least I didn’t have to patch anything to make it work.
With ser2net listening on port 2525 instead, Home Assistant can connect to it
(hooray!). But it immediately throws a different error: NotImplementedError: write_timeout is currently not supported. I’ve found another bug in a
rarely-exercised corner of this software stack, have I?
Well, kind of. Finding that error message in the pyserial
source,
something is trying to set the write timeout to zero and it’s simply not
implemented in pyserial for RFC2217 connections. This is ultimately because Home
Assistant (as alluded to earlier with bellows and zigpy) is all coroutine-based
so it uses pyserial-asyncio to
adapt the blocking APIs provided by pyserial to something that works nicely with
coroutines running on an event loop. When pyserial-asyncio tries to set
non-blocking mode by making the timeout zero, we find it’s not supported.
| |
While I could probably implement non-blocking support for RFC 2217 in pyserial, that seemed rather difficult and not my idea of fun. So instead I looked for a workaround- if RFC 2217 won’t work, does pyserial support a protocol that will?
The answer is of course yes: I can use socket:// for a raw socket connection
to the ser2net server. This sacrifices the ability to change UART parameters
(format, baud rate, etc) on the fly, but since the USB stick doesn’t support
changing parameters on the fly anyway (as far as I can tell), this is no problem.
Final configuration
The ser2net configuration that I’m now using looks like this:
| |
And the relevant stanza in Home Assistant configuration: (The baud rate needs
to be specified, but pyserial ignores it for socket:// connections.)
| |
After ensuring the zigbee.db file exists and restarting Home Assistant to
reload the configuration, I was able to pair all three sensors by following the
procedure defined above: call the permit service in Home Assistant, then
reset the sensor by holding the button until its LED blinks three times, then
tap the button every second or so for a bit.
I did observe some strange behavior on pairing the sensors that made me think
they weren’t pairing correctly, like error messages in the log (ERROR (MainThread) [homeassistant.components.sensor] Setup of platform zha is taking longer than 60 seconds. Startup will proceed without waiting any longer.) and
some parts of each sensor not appearing (the temperature might be shown, but not
humidity or pressure). Restarting Home Assistant after pairing the sensors made
everything appear as expected though, so there may be a bug somewhere in
there but I can’t be bothered to
debug it since there was a very easy workaround.
Complaining about async I/O
It’s rather interesting to me that the major bugs I encountered in trying to set up this system in a slightly unusual configuration were related to asynchronous I/O running in event loops- this is an issue that’s become something of my pet problem, such that I will argue to just about anybody who will listen that asynchronous I/O is usually unnecessary and more difficult to program.
That I discovered two separate bugs in the tools that make this work relating to running asynchronous I/O in event loops seems to support that conclusion. If Home Assistant simply spawned threads for components I believe it would simplify individual parts (perhaps at the cost of some slightly more complex low-level communication primitives) and make the system easier to debug. Instead, it runs all of its dependencies in a way they are not well-exercised in, presumably in search of “maximum performance” that seems entirely irrelevant when considering the program’s main function is acting as a hub for a variety of external devices.
I have (slowly) been working on distilling all these complaints into a series of essays on the topic, but for now this is a fine opportunity to wave a finger at something that I think is strictly worse because it’s evented.
Conclusion
I’m pretty happy with the sensors and software configuration I have now- the sensors are tiny and unobtrusive, while the software does a fine job of logging data and presenting live readings for my edification.
I’d like to also configure a “real” database like InfluxDB to store my sensor readings over arbitrarily long time periods (since Home Assistant doesn’t remember data forever, reasonably so), which shouldn’t be too difficult (it’s supported as a module) but is somewhat unrelated to setting up Zigbee sensors in the first place. Until then, I’m pretty happy with these results despite the fact that I think the developers have made a terrible choice with evented I/O.

Live sensor readings from Home Assistant; nice at a glance.
I did find somebody asking for input on the implementation of exactly that, but it looks like nothing ever came of it. A reply suggesting an application at the master end of a pty (pseudoterminal) suggests an interesting alternate option, but it doesn’t appear to be possible to receive parameter change requests from a pty (though flow control is exposed when running in “packet mode”). ↩︎
I was concerned at the outset that the router might be completely unable to see the Zigbee stick, since apparently the Archer C7 doesn’t include a USB 1.1 OHCI or UHCI controller, so it’s incapable of communicating at all with low-speed devices like keyboards! I’ve heard (but not verified myself) that connecting a USB 2.0 hub will allow the router to communicate with low-speed devices downstream of the hub as a workaround. ↩︎